Apple ][e emulator
Apple ][e emulator에서 돌린 문패트롤 프로그램이다.
Apple ][ Program Donwload Link
'컴퓨터 이야기' 카테고리의 다른 글
| 한글과 퍼스널 컴퓨터 (0) | 2008.10.08 |
|---|---|
| 옛날 컴퓨터 (0) | 2008.10.08 |
| Beagle Bros (0) | 2008.10.05 |
| 한글 그리고 내맘대로 작성해본 한글 오타마타 (0) | 2008.10.05 |
| JVC 7310 Mini NoteBook 분해기 (0) | 2008.09.28 |
Beagle Bros
비글 브로스 온라인 박물관
Apple ][ Computer를 한창 가지고 놀때 (그때는 공부하다 보다는 놀때가 어울렸다) 다양한 프로그램의 재미와 태크닉을 보여주던 회사였다.
자세히 기억은 나지 않지만 문자열을 기차처럼 움직이게 한다던가, 하여튼 아주 재미있고 기발한 프로그램을 보여줬던 회사이었기 때문에 당시에는 그런 재미있는 프로그램을 만드는 소프트웨어 회사라고 생각 했는데 지금 위키를 보니 베이직과 베이직 컴파일러도 만들었던 회사 였다는 것을 새롭게 알았다.
그런 다양한 테크닉의 프로그램을 보고 프로그래머의 꿈을 키우는 계기의 일부의 되었다.
'컴퓨터 이야기' 카테고리의 다른 글
| 옛날 컴퓨터 (0) | 2008.10.08 |
|---|---|
| Apple ][e emulator (0) | 2008.10.05 |
| 한글 그리고 내맘대로 작성해본 한글 오타마타 (0) | 2008.10.05 |
| JVC 7310 Mini NoteBook 분해기 (0) | 2008.09.28 |
| 160GB 하드 디스크 문제 발생 하다. (0) | 2008.09.28 |
한글 그리고 내맘대로 작성해본 한글 오타마타
1990년도쯤에는 한글을 컴퓨터로 처리하는데 여러가지 어려움이 많았기 때문에 자체적으로 한글을 출력하고 또 입력을 받는 엔진을 소프트웨어가 대 유행 이었다.
대표적인 프로그램이 아래한글이었는데 한글 처리의 선구자 적인 프로그램 이며 이찬진님 이 기고한 기사가 국내 프로그래머 들에게 한글 처리에 대한 지식을 일깨우는데 많은 역할을 하였다.
그런 유행에 따라 그당시 나도 한글 입출력 엔진을 작성해서 사용하곤 했었는데 그때 소스는 어디갔는지 알 수 없다.
덕분에 한글 입력기 프로그램 작성은 별 어려움 없이 지금이라도 만들수 있을 정도 인데, 2001년경에 작성한 사전 프로그램에도 한글 입력기를 직접 작성해 넣을 수 있었다.
아래 그림은 그당시쯤 그린 한글 오토마타의 기초 설계도 이다.
참고로 Personal 한글 입출력에 관해서는 1980년경 Apple ][ Computer에서 사용된 3327 한글이라는 프로그램이 사용되었는데 영문 환경에서 한글을 사용하기 위해 한글 프로그램을 시작하기 위해 Call 하는 어드레스가 3327번지 였기 때문에 “Call 3327”이라는 명령을 사용 했기 때문에 3327 한글이라고 불리웠다.
이후 IBM PC가 나올 당시에는 THP.com이라는 삼보 컴퓨터에서 나온 한글 프로그램을 대부분의 사용자 사용했던것으로 알고 있다. (위 두 한글 프로그램 모두가 삼보 컴퓨터에서 나온것으로 알고 있는데, 컴퓨터 산업에 많은 기여를 한 기업이었다.)
'컴퓨터 이야기' 카테고리의 다른 글
| Apple ][e emulator (0) | 2008.10.05 |
|---|---|
| Beagle Bros (0) | 2008.10.05 |
| JVC 7310 Mini NoteBook 분해기 (0) | 2008.09.28 |
| 160GB 하드 디스크 문제 발생 하다. (0) | 2008.09.28 |
| LG 휴대폰 USB Driver (0) | 2008.09.28 |
포토스케이프 (Photoscape)
사진 편집용 프로그램으로 포토웍스를 사용 하고 있었다.
그런데 또하나 찾은 포토스케이프는 우연히 찾은 프로그램인데 아주 좋다.
사진 뷰어로만 사용해도 손색이 없을것 같은데 편집 기능 까지 다양하게 제공 한다.
http://photoscape.tistory.com/
사진뷰어,사진편집,일괄편집,페이지,이어붙이기등 다양한 기능을 제공한다.
사진뷰어에서 사진을 골라서 편집 하고 싶으면 <Shift> <Enter>를 누르면 사진 편집 메뉴로 넘어가서 바로 사진을 편집 할 수 있다.
사진 편집은 기본 기능으로 테두리, 레벨조정, 미리보기등이 있으며 개체에서는 말풍선달기등이 가능 하다.
<말풍선 넣기>
'컴퓨터 이야기 > 소프트웨어' 카테고리의 다른 글
| 구글 크롬 웹브라우저를 사용해보자 (0) | 2008.10.17 |
|---|---|
| 이영희 구글 테마 (0) | 2008.10.09 |
| Notebook 배터리 관리 Program (0) | 2008.10.02 |
| Cobian Backup (0) | 2008.09.27 |
| igoogle (익스플로러 초기화면) (0) | 2008.09.26 |
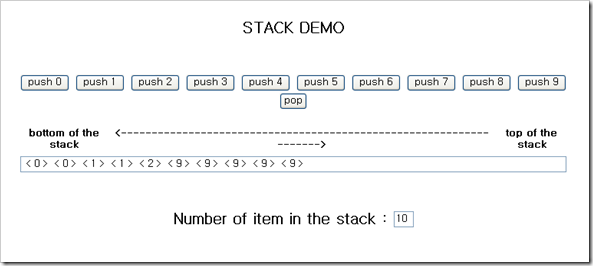
자바 스크립트로 만든 Stack Demo
자바 스크립트로 2001년 1월에 만든 Stack Demo 프로그램
<html>
<head>
<title> Html Stack </title>
</head>
<script language="javascript">
<!--
// [ ]---------------------------------------[ ]
// | Stack Object |
// | Written by lng |
// | 2001. 1. xx |
// [ ]---------------------------------------[ ]
function Push(TrVal)
{
this.Stack[this.Head] = TrVal
this.Head++
}
function Pop()
{
if (this.Head>0)
{
this.Head--
return this.Stack[this.Head+1]
}
else
return null
}
function GetTop()
{
if (this.Head>0)
{
return this.Stack[this.Head]
}
else
return null
}
function GetnValue(nValue)
{
if (this.Head>=nValue)
{
return this.Stack[nValue]
}
else
return null
}
function Getn()
{
return this.Head
}
function IsEmpty()
{
if (this.Head>0)
{
return false
}
else
return true
}
function ProStack()
{
this.Head = 0
this.Push = Push // Push a value to the stack
this.Pop = Pop // Pop a value to the stack
this.ViewTop = GetTop // Get a value which is the value on top of the stack
this.IsEmpty = IsEmpty // Check the stack which is empty or not
this.GetnValue = GetnValue // Get a value which is the value of n'st in the stack
this.GetTop = GetTop
this.Getn = Getn
this.Stack = new Array()
return this
}
//-->
</script>
<body>
<center>
<form name="stack">
<p>
<h2> STACK DEMO </h>
<br> <br> <br>
<input type="button" name="but0" value="push 0" onClick="PushItem('0')">
<input type="button" name="but1" value="push 1" onClick="PushItem('1')">
<input type="button" name="but2" value="push 2" onClick="PushItem('2')">
<input type="button" name="but3" value="push 3" onClick="PushItem('3')">
<input type="button" name="but4" value="push 4" onClick="PushItem('4')">
<input type="button" name="but5" value="push 5" onClick="PushItem('5')">
<input type="button" name="but6" value="push 6" onClick="PushItem('6')">
<input type="button" name="but7" value="push 7" onClick="PushItem('7')">
<input type="button" name="but8" value="push 8" onClick="PushItem('8')">
<input type="button" name="but9" value="push 9" onClick="PushItem('9')">
<input type="button" name="but9" value="pop" onClick="PopItem()">
</p>
<p>
<table border=0>
<tr>
<th> bottom of the stack</th>
<th> <-------------------------------------------------------------------> </th>
<th> top of the stack</th>
<tr>
</table>
<input type="text" name="text1" value=" " size=100> <br>
<br><br>
Number of item in the stack : <input type="text" name="text2" value=" " size=2>
</p>
<script language="javascript">
<!--
TStack = new ProStack
function PushItem(AValue)
{
TStack.Push(AValue)
DisplayStack()
}
function PopItem(AValue)
{
TStack.Pop()
DisplayStack()
}
function DisplayStack()
{
var i
i = TStack.Getn()
document.stack.text1.value = ""
document.stack.text2.value = i
for(i=0;i<TStack.Getn();i++)
document.stack.text1.value
= document.stack.text1.value + " < " + TStack.GetnValue(i) + " > "
}
//-->
</script>
</form>
</center>
</body>
</html>
'컴퓨터 이야기 > JAVA(자바)' 카테고리의 다른 글
| JAVA에서 Excel 파일 읽고 쓰기 (작성중) (0) | 2011.02.05 |
|---|---|
| 자바 GUI 디자이너 WindowBuilder Pro 설치 방법 (0) | 2011.02.02 |
| 이클립스로 자바 프로그램 Hello World 만들기 (3) | 2011.02.02 |
| java 처음 시작 (환경 설정) (0) | 2009.08.01 |
| 자바 스크립트로 만든 계산기 (0) | 2008.10.02 |
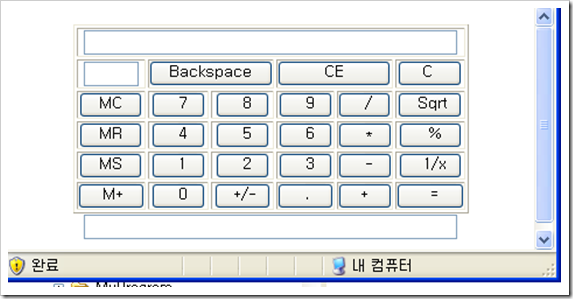
자바 스크립트로 만든 계산기
오래전 하드 디스크를 뒤져 보다가 2001년 1월에 자바 스크립트로 만든 계산기가 있었다.
<<소스>>
<html>
<head>
<title> Html 계산기 </title>
</head>
<script language="javascript">
<!--
// [ ]---------------------------------------[ ]
// | Stack Object |
// | Written by lng |
// | 2001. 1. xx |
// [ ]---------------------------------------[ ]
function Push(TrVal)
{
this.Stack[this.Head] = TrVal
this.Head++
}
function Pop()
{
if (this.Head>0)
{
this.Head--
return this.Stack[this.Head+1]
}
else
return null
}
function GetTop()
{
if (this.Head>0)
{
return this.Stack[this.Head]
}
else
return null
}
function GetnValue(nValue)
{
if (this.Head>=nValue)
{
return this.Stack[nValue]
}
else
return null
}
function Getn()
{
return this.Head
}
function IsEmpty()
{
if (this.Head>0)
{
return false
}
else
return true
}
function ProStack()
{
this.Head = 0
this.Push = Push // Push a value to the stack
this.Pop = Pop // Pop a value to the stack
this.ViewTop = GetTop // Get a value which is the value on top of the stack
this.IsEmpty = IsEmpty // Check the stack which is empty or not
this.GetnValue = GetnValue // Get a value which is the value of n'st in the stack
this.GetTop = GetTop
this.Getn = Getn
this.Stack = new Array()
return this
}
//-->
</script>
<body>
<center>
<form name="calc">
<table cellspaceing=0 cellpadding=0 border=1>
<th colspan=6>
<input type=text size=44 name=LCD align=right>
</th>
<tr>
<td align=center> <input type=text value=" " size=5 name=MemoryDisplay> </td>
<td align=center colspan=2> <input type=button value="Backspace" name=BackSpace
onClick="ExpAna(document.calc.LCD, 'BS')" > </td>
<td colspan=2 align=center> <input type=button value=" CE " name=CE
onClick="ExpAna(document.calc.LCD, 'CE')" > </td>
<td align=center> <input type=button value=" C " name=C
onClick="ExpAna(document.calc.LCD, 'C')" > </td>
</tr>
<tr>
<td align=center> <input type=button value=" MC " name=MemoryClear
onClick="ExpAna(document.calc.LCD, 'MC')" > </td>
<td align=center> <input type=button value=" 7 " name=Seven
onClick="ExpAna(document.calc.LCD, '7')" > </td>
<td align=center> <input type=button value=" 8 " name=Eight
onClick="ExpAna(document.calc.LCD, '8')" > </td>
<td align=center> <input type=button value=" 9 " name=Nine
onClick="ExpAna(document.calc.LCD, '9')" > </td>
<td align=center> <input type=button value=" / " name=Slash
onClick="ExpAna(document.calc.LCD, '/')" > </td>
<td align=center> <input type=button value=" Sqrt " name=Sqrt
onClick="ExpAna(document.calc.LCD, 'SQRT')" > </td>
</tr>
<tr>
<td align=center> <input type=button value=" MR " name=MemoryRestore
onClick="ExpAna(document.calc.LCD, 'MR')" > </td>
<td align=center> <input type=button value=" 4 " name=Four
onClick="ExpAna(document.calc.LCD, '4')" > </td>
<td align=center> <input type=button value=" 5 " name=Five
onClick="ExpAna(document.calc.LCD, '5')" > </td>
<td align=center> <input type=button value=" 6 " name=Six
onClick="ExpAna(document.calc.LCD, '6')" > </td>
<td align=center> <input type=button value=" * " name=Multifly
onClick="ExpAna(document.calc.LCD, 'MUL')" > </td>
<td align=center> <input type=button value=" % " name=Percent
onClick="ExpAna(document.calc.LCD, 'PER')" > </td>
</tr>
<tr>
<td align=center> <input type=button value=" MS " name=MemorySave
onClick="ExpAna(document.calc.LCD, 'MS')" > </td>
<td align=center> <input type=button value=" 1 " name=One
onClick="ExpAna(document.calc.LCD, '1')" > </td>
<td align=center> <input type=button value=" 2 " name=Two
onClick="ExpAna(document.calc.LCD, '2')" > </td>
<td align=center> <input type=button value=" 3 " name=Three
onClick="ExpAna(document.calc.LCD, '3')" > </td>
<td align=center> <input type=button value=" - " name=Minus
onClick="ExpAna(document.calc.LCD, 'MINUS')" > </td>
<td align=center> <input type=button value=" 1/x " name=Reverse
onClick="ExpAna(document.calc.LCD, 'REV')" > </td>
</tr>
<tr>
<td align=center> <input type=button value=" M+ " name=MemoryPlus
onClick="ExpAna(document.calc.LCD, 'MP')" > </td>
<td align=center> <input type=button value=" 0 " name=Zero
onClick="ExpAna(document.calc.LCD, '0')" > </td>
<td align=center> <input type=button value=" +/- " name=Significant
onClick="ExpAna(document.calc.LCD, 'SIG')" > </td>
<td align=center> <input type=button value=" . " name=Point
onClick="ExpAna(document.calc.LCD, 'POINT')" > </td>
<td align=center> <input type=button value=" + " name=Plus
onClick="ExpAna(document.calc.LCD, 'PLUS')" > </td>
<td align=center> <input type=button value=" = " name=Equal
onClick="ExpAna(document.calc.LCD, 'EQUAL')" > </td>
</tr>
</table>
<input type=text size=44 name=debug align=right>
<script language="javascript">
<!--
var AutoStatus=0 // Automata status. now Start status
TStack = new ProStack()
function ExpAna(LCD, KeyVal)
{
switch (AutoStatus)
{
case 0 :
if (KeyVal >= "0" && KeyVal <="9")
{
LCD.value = KeyVal
AutoStatus = 1
}
break
case 1 :
if (KeyVal == "BS")
{
document.calc.debug.value = LCD.value.length
LCD.value = LCD.value.substring(0,LCD.value.length-1)
}
else if (KeyVal >= "0" && KeyVal <="9")
{
LCD.value = LCD.value + KeyVal
}
break
default :
}
}
//-->
</script>
</form>
</center>
</body>
</html>
'컴퓨터 이야기 > JAVA(자바)' 카테고리의 다른 글
| JAVA에서 Excel 파일 읽고 쓰기 (작성중) (0) | 2011.02.05 |
|---|---|
| 자바 GUI 디자이너 WindowBuilder Pro 설치 방법 (0) | 2011.02.02 |
| 이클립스로 자바 프로그램 Hello World 만들기 (3) | 2011.02.02 |
| java 처음 시작 (환경 설정) (0) | 2009.08.01 |
| 자바 스크립트로 만든 Stack Demo (0) | 2008.10.02 |


